
Build the Ideal Cordova Dev Environment
Laptops are very personal, very private things. As the days and months pass by, little piles of messes accrue in the file system that are uniquely our own. At the same time, a developer’s laptop is also finely tuned for productivity. As someone who has developed quite a few mobile apps using Apache Cordova, I thought it might be fun to share some of the optimizations I’ve made to my laptop for Cordova development.
I haven’t found the ideal dev environment yet – I’m always tweaking things – but it’s a beautiful mess. This post describes how to build a good dev environment for cross-platform development targeting iOS, Android and Windows.
- Hardware
- Node Version Manager (NVM)
- Globally Installed NPM Packages
- VS Code
- .bash_profile
- Android SDK
- Android Emulator
- Parallels
- Visual Studio
- Remote Build Agent
If you’ve got suggestions for improvement, I would looooove to hear them. 💖 Share your tips in the comments section below.
Hardware
If you’re targeting iOS, you need a Mac somewhere in the equation. Likewise, if you’re targeting Windows, you need Windows. Until Apple changes their licensing, the only way for the two systems to co-exist on the same hardware is by running Parallels on a Mac device. So, that’s what I do.
- Hardware: 13” MacBook Pro with all the RAM and disk upgrades available.
- Operating Systems: Mac OSX El Capitan and Parallels running Windows 10.
If it’s not an option for you to develop on a Mac, there are plenty of cloud build solutions available (e.g. PhoneGap Build, MacInCloud, Mac Stadium), but since this tutorial is focused on building a local development environment, we’ll leave that subject for another day.
Mobile Device Library 📱
For local testing, I keep a library of devices and operating systems representative of the general population. My goal isn’t to test against everything, but to cover the “big players.”
- iPhone 5
- iPhone 6s
- Samsung Galaxy S4
- Nexus 7
- Windows 950
Node Version Manager (NVM)
Besides Cordova itself, Node Version Manager (NVM) is the single most important piece of software for you to install. Not all versions of Node and NPM are compatible with all versions of Cordova. In fact, it’s kind of a complicated mess:
| Cordova | Node | NPM |
|---|---|---|
| <5.3.3 | ^0.12.0 | ^2.0.0 |
| >=5.3.3 | ~4.0.0 | ^2.0.0 |
| >=5.4.1 | ^5.0.0 | ^3.0.0 |
NVM allows you to install and manage multiple versions of Node + NPM simultaneously on the same machine. If you’re going to maintain multiple projects over time, NVM allows you to continue using Cordova 4.x with Node 0.12 on old maintenance projects, while using the latest-and-greatest versions of Node + NPM on your new projects.
Also, because NVM installs packages in the user’s local directory where you have ownership rights, permission errors caused by installing NPM packages with sudo go away. For an eloquent explanation of why you should avoid using sudo with npm , read this post from Explosion Pills. The relevant part:
Using
sudo npm install(and potentiallysudo npm <anything>) is a bad idea ™. This is an issue for at least a few reasons:
npm installhas the ability to run arbitrary scripts. Due to how npm is set up and the fact that you can alter the registry and it can use DNS, it is possible that you will accidentally install a malicious package in general, install a malicious package masquerading as a perfectly valid package, or install a package with good intentions that may run scripts that are somehow detrimental to your system if run as root.Running
sudonpm install (without -g) will create a local directory that can only be altered by the root user. This can really screw things up for you if you try to donpm <something>in the same directory or project later on.Even
sudo npm install -gwith a valid installation target can mess things up for you and make it hard to use npm withoutsudounder some circumstances in the future – particularly if you change your npmconfiguration midstream. The root user can and will create files in your npm cache and potentially a file like~/.npm/_locks, and future npm installornpm install -gwill give you the dreaded EACCES error.
NVM makes it so that you never have to use sudo again. Installing it is easy. Simply follow the instructions on the NVM website.
# install nvm
curl -o- https://raw.githubusercontent.com/creationix/nvm/v0.31.1/install.sh | bash

# confirm that nvm is installed
nvm --version

# install the latest stable release
nvm install v4.4.4

# make it the default
nvm alias default v4.4.4
I recommend using the last stable version of Node for Cordova development. Remember that even (as opposed to odd) version numbers are officially stable and “Long Term Supported.”
Globally Installed NPM Packages
When building a new machine, there are a few utilities that I expect to use in (almost) every project. Rather than install a duplicate instance in each project directory, I prefer to install these npm packages globally:
| Package Name | Why? |
|---|---|
| cordova | This is a Cordova development environment, right? Required. |
| ionic | Ionic delivers silky smooth, good-looking UI and provides a good starting point for most projects. |
| taco-cli | TACO provides an array of utilities for Cordova development, including --livereload which auto-refeshes the webview on save for browsers, emulators and devices |
| code-push-CLI | Code Push is my preferred service for publishing updates without re-submitting to the app store. |
| typescript | TypeScript provides a much better code editing experience than JavaScript alone with auto-complete, code refactoring and access to future JS features (e.g. decorators) that aren’t available in ES6 today. It’s also recommended by the teams building Ionic and Angular. |
| eslint | Eslint will help you enforce a sensible coding style guide without being a jerk about it. |
| eslint-plugin-standard | This plugin forms the foundation of our coding style guide. |
| git | Source control is kinda necessary. Required. |
| gulp | Gulp is a build task manager. It might be a little old school, but it’s simple and gets the job done. You might prefer Browserify or Web Pack. |
| ios-deploy | Enables ios-build. |
| ios-sim | Enables launch to the ios simulator without opening xcode |
| remotebuild | RemoteBuild is a simple node server that allows your Windows VM to delegate iOS builds to Xcode and launch the simulator. In other words, it allows you to build for iOS from your Windows machine. |
You can install all of them at once by executing:
npm install -g cordova ionic code-push-cli typescript eslint eslint-plugin-standard git gulp ios-deploy ios-sim remotebulidVS Code
I use VS Code as my primary editor. It’s based on Atom, but don’t be fooled into thinking it’s an Atom clone. Besides being significantly faster – especially with large projects – Code has a number of advantages:
- Large ecosystem of plugins, extensions and themes
- Git integration
- Built-in debugger
- Wicked good intellisense and code refactoring features
To the default installation, I add the following extensions:
| Extension | Why? |
|---|---|
| Cordova-tools | Adds both Cordova and Ionic CLI integration, debugging tools for iOS/Android, intellisense for plugins and code snippets for Ionic UI controls. |
| ESLint | This plugin leverages the ESLint npm packages installed above. Style violations receive a red squiggly in the code editor. You can right-click on any of these errors and auto-fix all the errors in your project. |
| TSLint | TSLint provides the same features offered by ESLint, but for TypeScript rather than JavaScript. |
To install these extensions, simply invoke the Command Pallette with Command+P (Mac) or Control+P (Windows) and type:
> ext install cordova-tools
> ext install eslint
> ext install tslint
Edit, Preview and Debug Loop
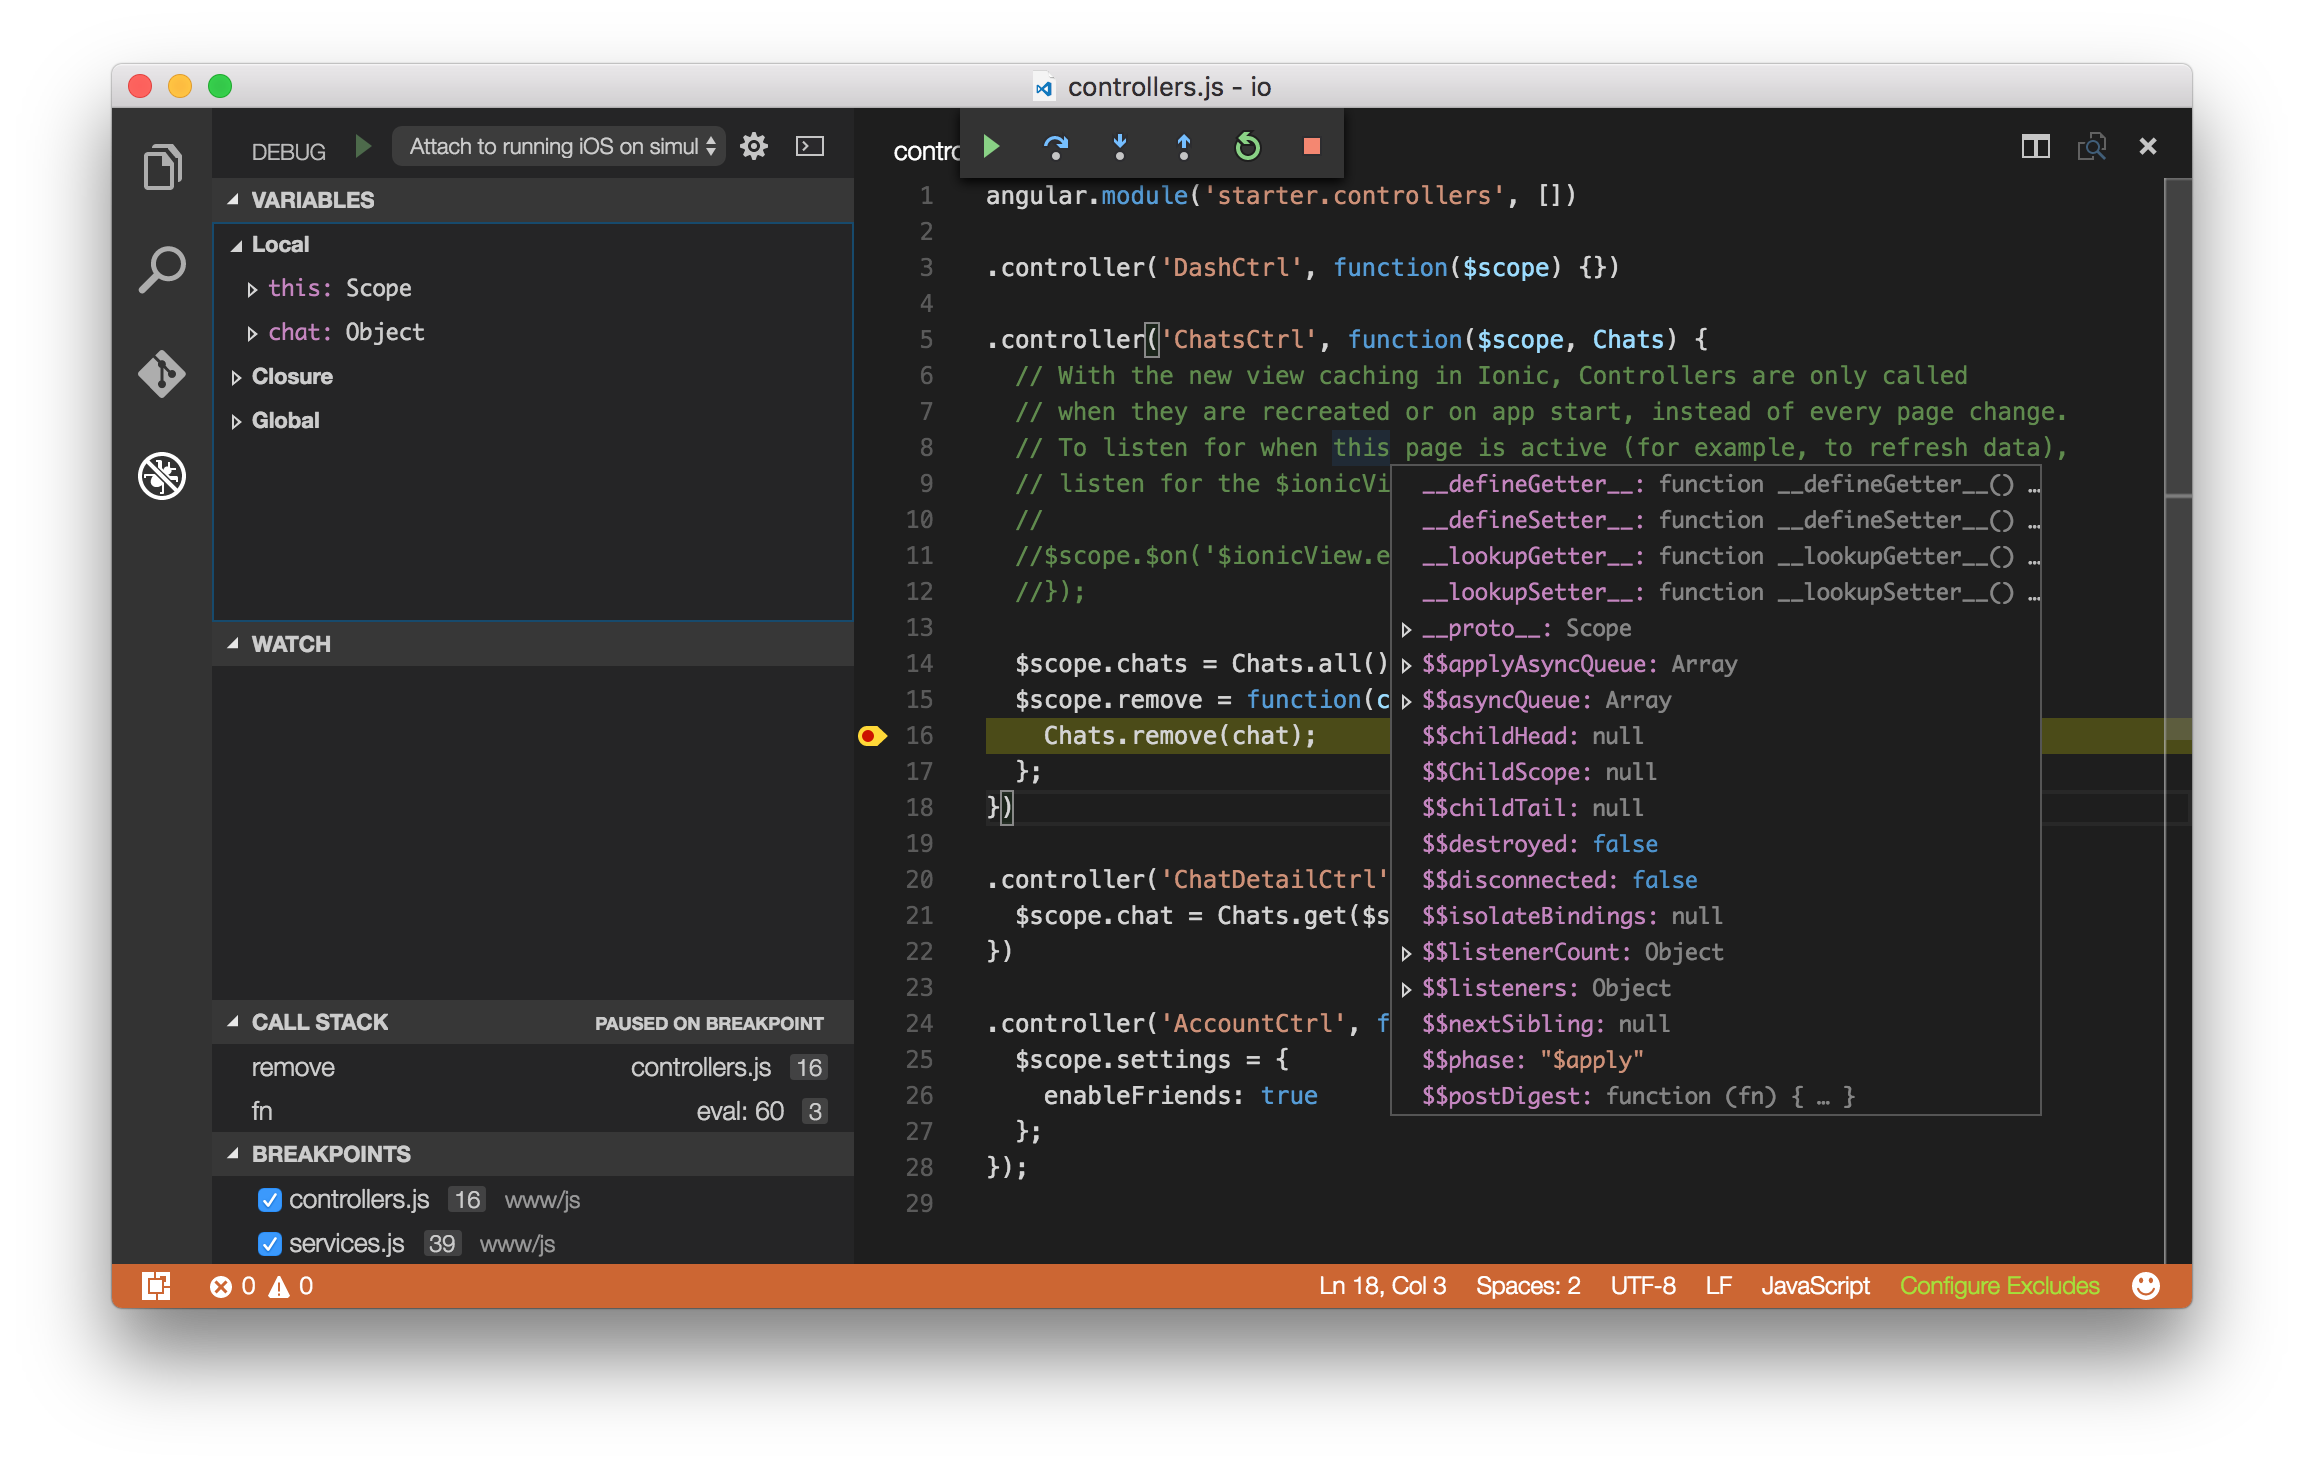
Like most developers, the vast majority of my time is spent in a quick, iterative loop where I progressively (1) edit code, (2) refresh the webview, then (3) debug and inspect the result. There are lots of tricks intended to shortcut steps within this loop – mostly by auto-refreshing the webview on save.
I accomplish this today using either taco run ios --livereload or ionic serve --lab depending on the circumstances.
Generally speaking, I use taco run [platfrom] --livereload any time I want to deploy to an emulator or device where (a) all the plugins work and (b) fidelity is high. Meanwhile, I reserve ionic serve --lab for those situations where I merely want to work quickly on a desktop browser and don’t need plugins or perfect simulation.
.bash_profile
So much magic happens in the terminal. It’s a shame that it’s so damn ugly and illegible by default. A lot of people choose oh-my-zsh, but I’m quite fond of my custom .bash_profile assembled from a handful of online tutorials and pimped out to match my personal tastes. You can find my .bash_profile here: http://github.com/ryanjsalva/bash.
The basic strategy is to declare nothing directly in .bash_profile, but instead break the file into multiple modules which I import. You can learn a lot by just looking at the code, but I’ll point out a few important features below.
.bash_nvm
This file is required to use NVM, but it also adds command completion to your terminal. To see completion in action, type “nvm” in the terminal, then tab to complete partial words or double-tab between words to get a list of all the actions & arguments available.
# export NVM directory
export NVM_DIR="$HOME/.nvm"

# enable command completion
[[ -r $NVM_DIR/bash_completion ]] && . $NVM_DIR/bash_completion

# source NVM
[ -s "$NVM_DIR/nvm.sh" ] && . "$NVM_DIR/nvm.sh"
.bash_finder
This file is totally for the “power user.” 💪 It defines shortcuts for common terminal tasks. For example, these lines provide an easy way to show/hide all the hidden system dot files like .gitignore
# Show hidden files in Finder
alias showFiles='defaults write com.apple.finder AppleShowAllFiles YES; killall Finder /System/Library/CoreServices/Finder.app'

#   Hide hidden files in Finder
alias hideFiles='defaults write com.apple.finder AppleShowAllFiles NO; killall Finder /System/Library/CoreServices/Finder.app'
I also include several shortcuts to make Terminal navigation easier:
# Opens current directory in MacOS Finder
alias f='open -a Finder ./'

#   'cd' to frontmost window of MacOS Finder
cdf () {
    currFolderPath=$( /usr/bin/osascript <<EOT
        tell application "Finder"
            try
        set currFolder to (folder of the front window as alias)
            on error
        set currFolder to (path to desktop folder as alias)
            end try
            POSIX path of currFolder
        end tell
EOT
    )
    echo "cd to \"$currFolderPath\""
    cd "$currFolderPath"
}

# Always list files/folders after cd
cd () { command cd "$@"; ll; }

# Go Home
alias ~="cd ~"

# Clear terminal display
alias c='clear'

# Find executables
alias which='type -all'

# After you create a directory, cd into it
mkdir() { command mkdir -p "$1"; cd "$1"; }

# Move a file to the MacOS trash
trash () { command mv "$@" ~/.Trash; ll; }

# Full Recursive Directory Listing
alias lr='ls -R | grep ":$" | sed -e '\''s/:$//'\'' -e '\''s/[^-][^\/]*\//--/g'\'' -e '\''s/^/   /'\'' -e '\''s/-/|/'\'' | less'

# Create a ZIP archive of a folder
zipf () { zip -r "$1".zip "$1" ; }
You’ll find many more shortcuts defined in my GitHub repository, so be sure to look there for inspiration.
.bash_cordova
This little gem comes from the Apache Cordova project and provides completion for Cordova CLI. Tab to complete partial words or double-tab between words to get a list of all the actions & arguments available.
.bash_network
Again, this is for the power user and helps you get information about your local network.
# Show all open TCP/IP sockets
alias netCons='lsof -i'

# Flush out the DNS Cache
alias flushDNS='dscacheutil -flushcache'

# Display open sockets
alias lsock='sudo /usr/sbin/lsof -i -P'

# Display only open UDP sockets
alias lsockU='sudo /usr/sbin/lsof -nP | grep UDP'

# Display only open TCP sockets
alias lsockT='sudo /usr/sbin/lsof -nP | grep TCP'

# Get info on connections for en0
alias ipInfo0='ipconfig getpacket en0'

# Get info on connections for en1
alias ipInfo1='ipconfig getpacket en1'

# All listening connections
alias openPorts='sudo lsof -i | grep LISTEN'

# All ipfw rules inc/ blocked IPs
alias showBlocked='sudo ipfw list'

# My external ip address
alias myip="dig +short myip.opendns.com @resolver1.opendns.com"

# My local/internal ip address
alias localip="ipconfig getifaddr en0"
.bash_prompt
This prompt makes me happy. 😸 It does four things:
- Adds color
- Identifies the current version of Node (super-important when using NVM)
- Identifies the current branch when navigating a directory under source control
- Adds emoji flare to make the command line a little more rock ‘n roll
function my_prompt(){
    NODEV=`node --version`
    NVMV="[node:$NODEV]"

    GIT=''
    BRANCH=`git branch 2> /dev/null | grep \* | awk '{print $2}'`
    if [[ "$BRANCH" != "" ]]; then
    GIT="[git:$BRANCH]"
    fi
    printf "\n$txtred$PWD $txtwht$NVMV $GIT$txtrst\n"
}

PROMPT_COMMAND=my_prompt
export PS1="⚡ "
Android SDK
It goes without saying that if you want to build for Android, then you need the Android SDK. Unless you want develop custom plugins, you don’t need Android Studio. Instead, keep it “light” and just install the Command Line Tools (a.k.a. the SDK).
Once you’ve installed the Android command line tools, go to your Terminal and open the SDK package manager by typing android. Google encourages you to download and install a bunch of stuff you don’t need. Instead, uncheck everything and only select the following options:
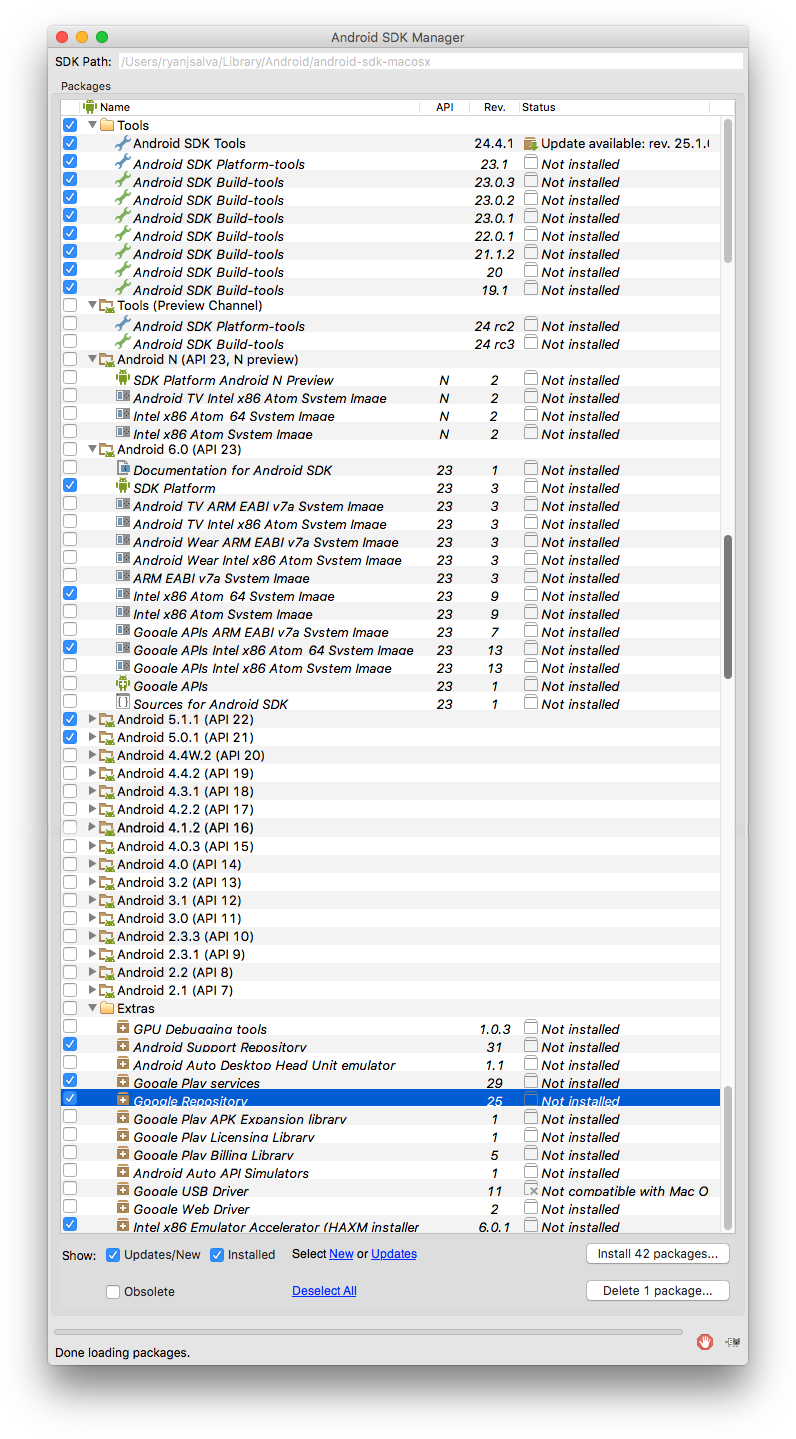
| Package | Why? |
|---|---|
| Tools (everything) | These are your build tools. If you want to build an APK, you’ll need everything here. |
| Android [version] (API [number]) | SDK Platform |
Pay particular attention to the last option in the list: Intel x86 Emulator Accelerator (HAXM Installer). This option is critical because the Google emulator is slooooooow. 🐌 Unless you want to pay $400+ per year for the Genymotion emulator on your Mac, HAXM is your best option to improve Android emulator performance. But it requires an extra step to complete installation.
After you’ve installed all the API packages, open ~/Library/Android/android-sdk-macosx/extras/intel/Hardware_Accelerated_Execution_Manager/IntelHAXM_6.0.1.dmg to finish installing HAXM. Follow the installation instructions accepting all the defaults, then you’ll be ready to start your first emulator.
Android Emulator
Whenever possible, I use a tethered device because they are faster and of higher fidelity. But if I don’t have a device handy or need to test on a version of the OS that’s not in my device library, then to-the-emulator I go.
Google’s Android emulator doesn’t come with any pre-configured devices, so you have to create one first. From the terminal, run android avd to open the Android Virtual Device Manager. Under the “Android Virtual Devices” tab, click “Create” and configure your first device as shown below.
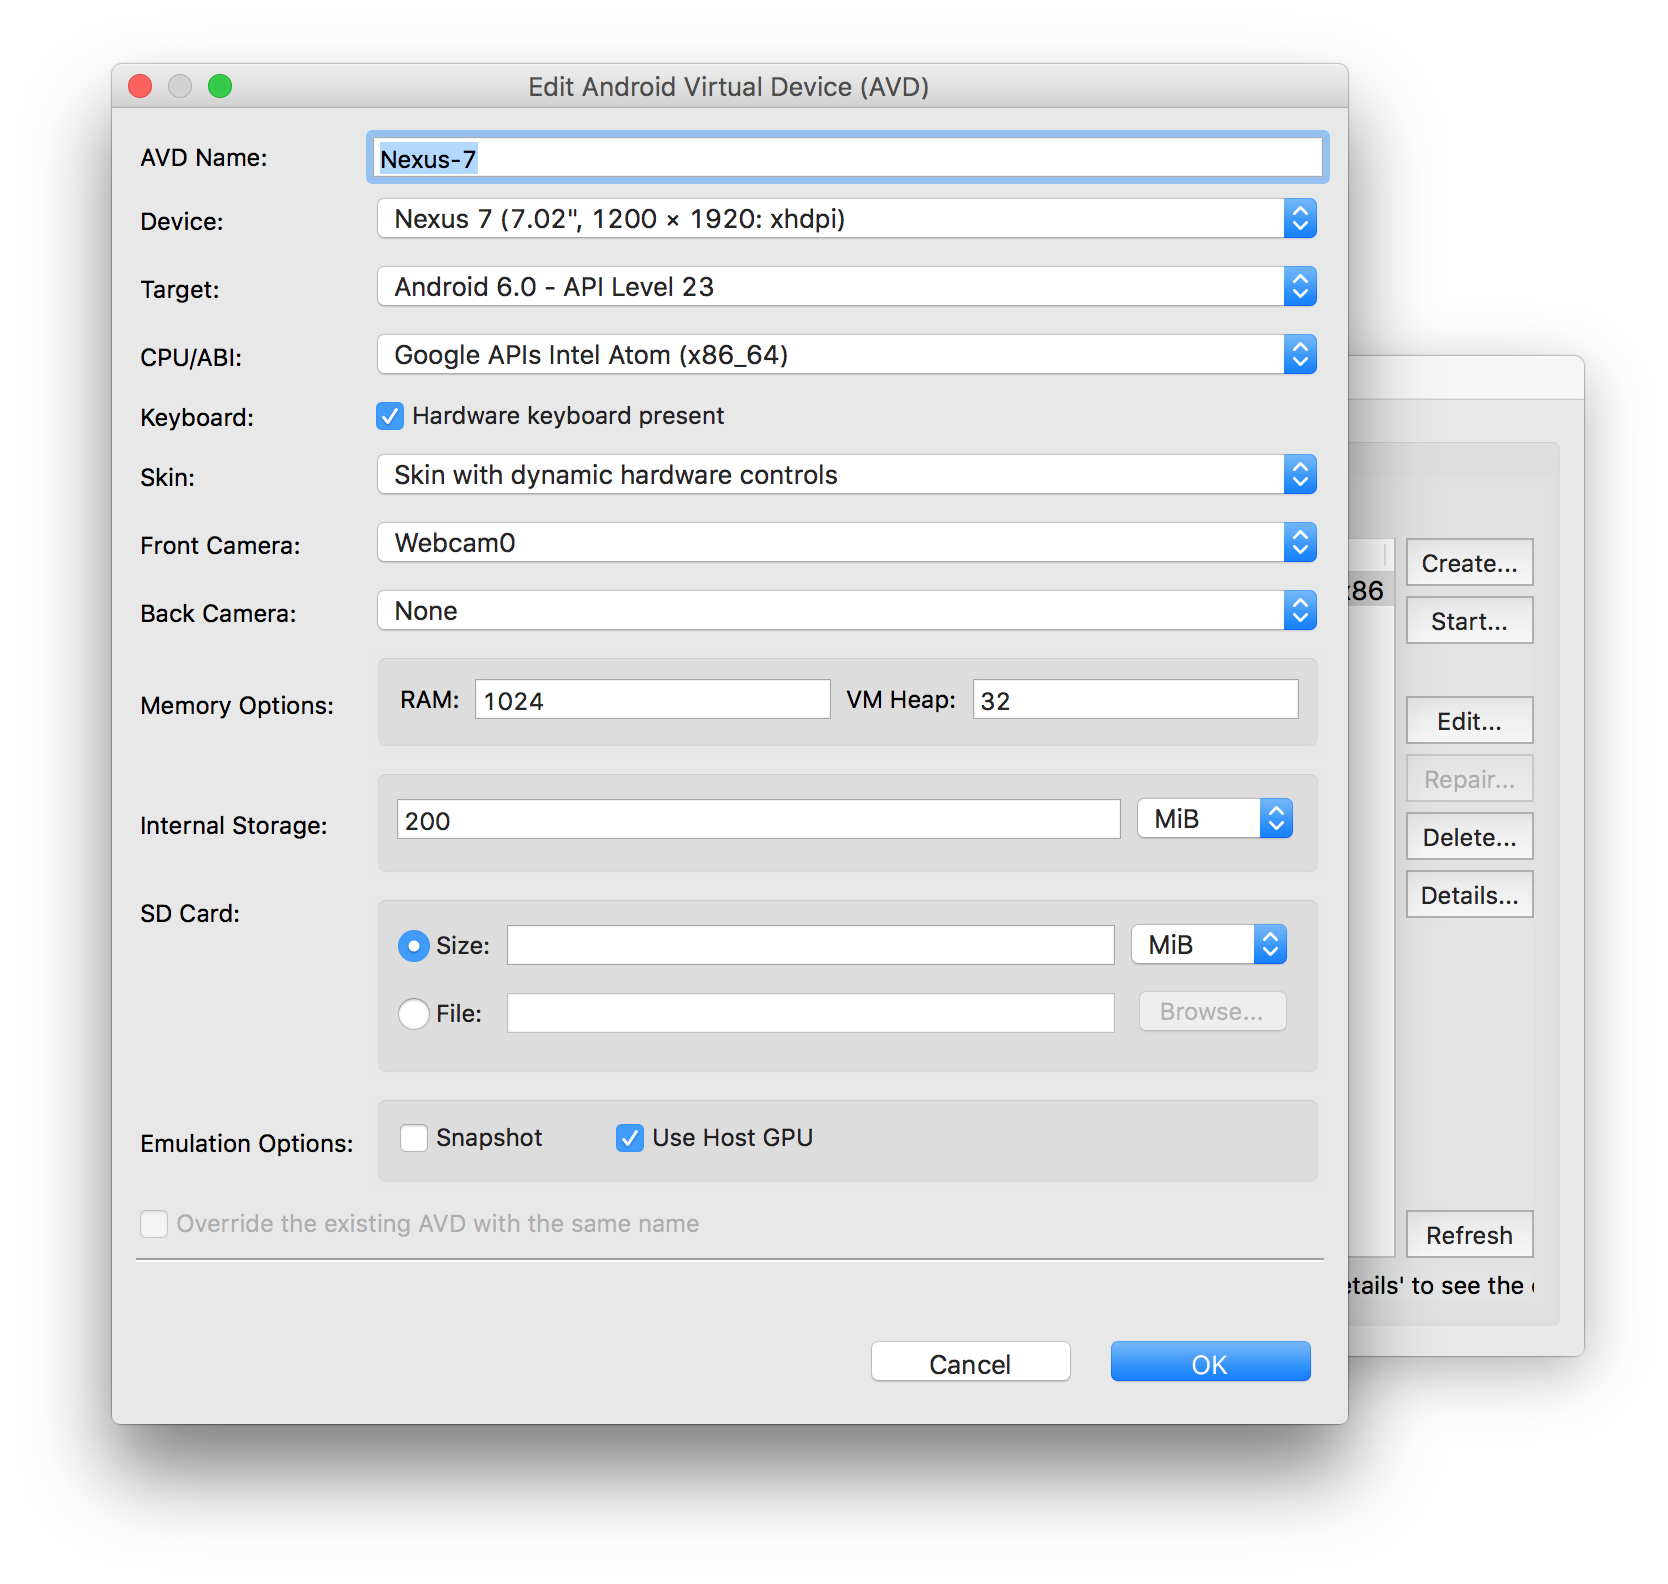
| Setting | Value | Why? |
|---|---|---|
| AVD Name | Nexus-7 | Just pick something short and descriptive |
| Device | Nexus 7 | This is a good catch-all device representative of tablets. |
| Target | Android 6.0 - API Level 23 | A recent version of the OS. You’ll want to create emulators for older versions, too. |
| CPU/ABI | Google APIs Intel Atom | ? |
| Keyboard | Checked | ? |
| Skin | Skin with dynamic hardware controls | You can use the controls to change device orientation, “shake” the device, click the home button, etc. |
| Front Camera | Webcam | I prefer to use my laptop’s webcam over the Max Headroom floating ball. |
| Memory Options | RAM: 1024, VM Heap: 32 | ? |
| Internal Storage | ? | ? |
| SD Card | ? | ? |
| Emulation Options | ? | ? |
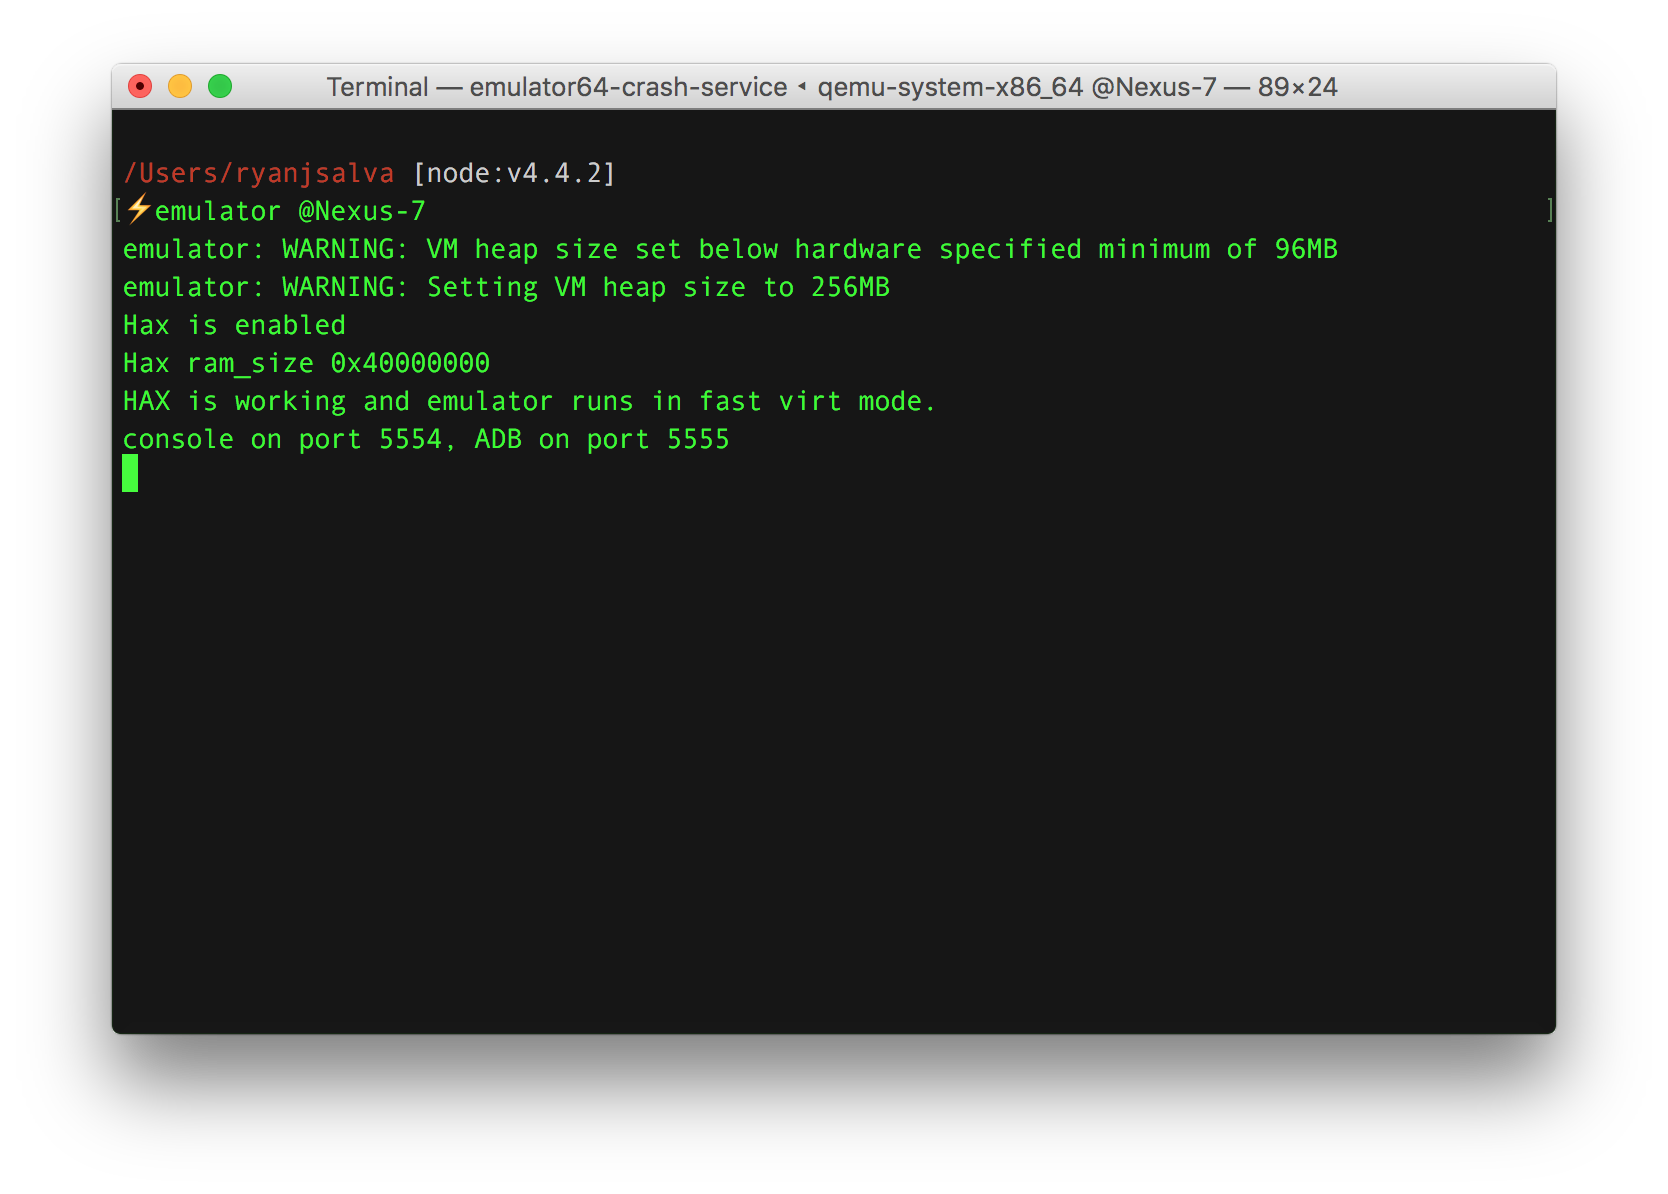
Once you’re done configuring, you can go back to the terminal and launch your emulator with:
# start the emulator
emulator @Nexus-7 &
The & at the end of that command means, “open in the background.” Observe that the emulator… well, it’s not fast, but it’s not horrifically slow because Intel’s HAXM is speeding things up:
Other Apps on the Mac
| App | Why? |
|---|---|
| Xcode | Build tools for iOS |
| PhotoShop | Graphic Design (bitmap) |
| Illustrator | Graphic Design (vector) |
| Hellium | For when I want to have a video playing while I work |
| MAMP | Local server for rare occasion when I’m coding PHP |
| Slack | Team collaboration |
Configuring Parallels
Once you’ve setup your Mac, the hard part is over. Windows is surprisingly easy to install and configure. When setting up your Windows virtual machine, Parallels will give you the option to optimize for “Software Development.”
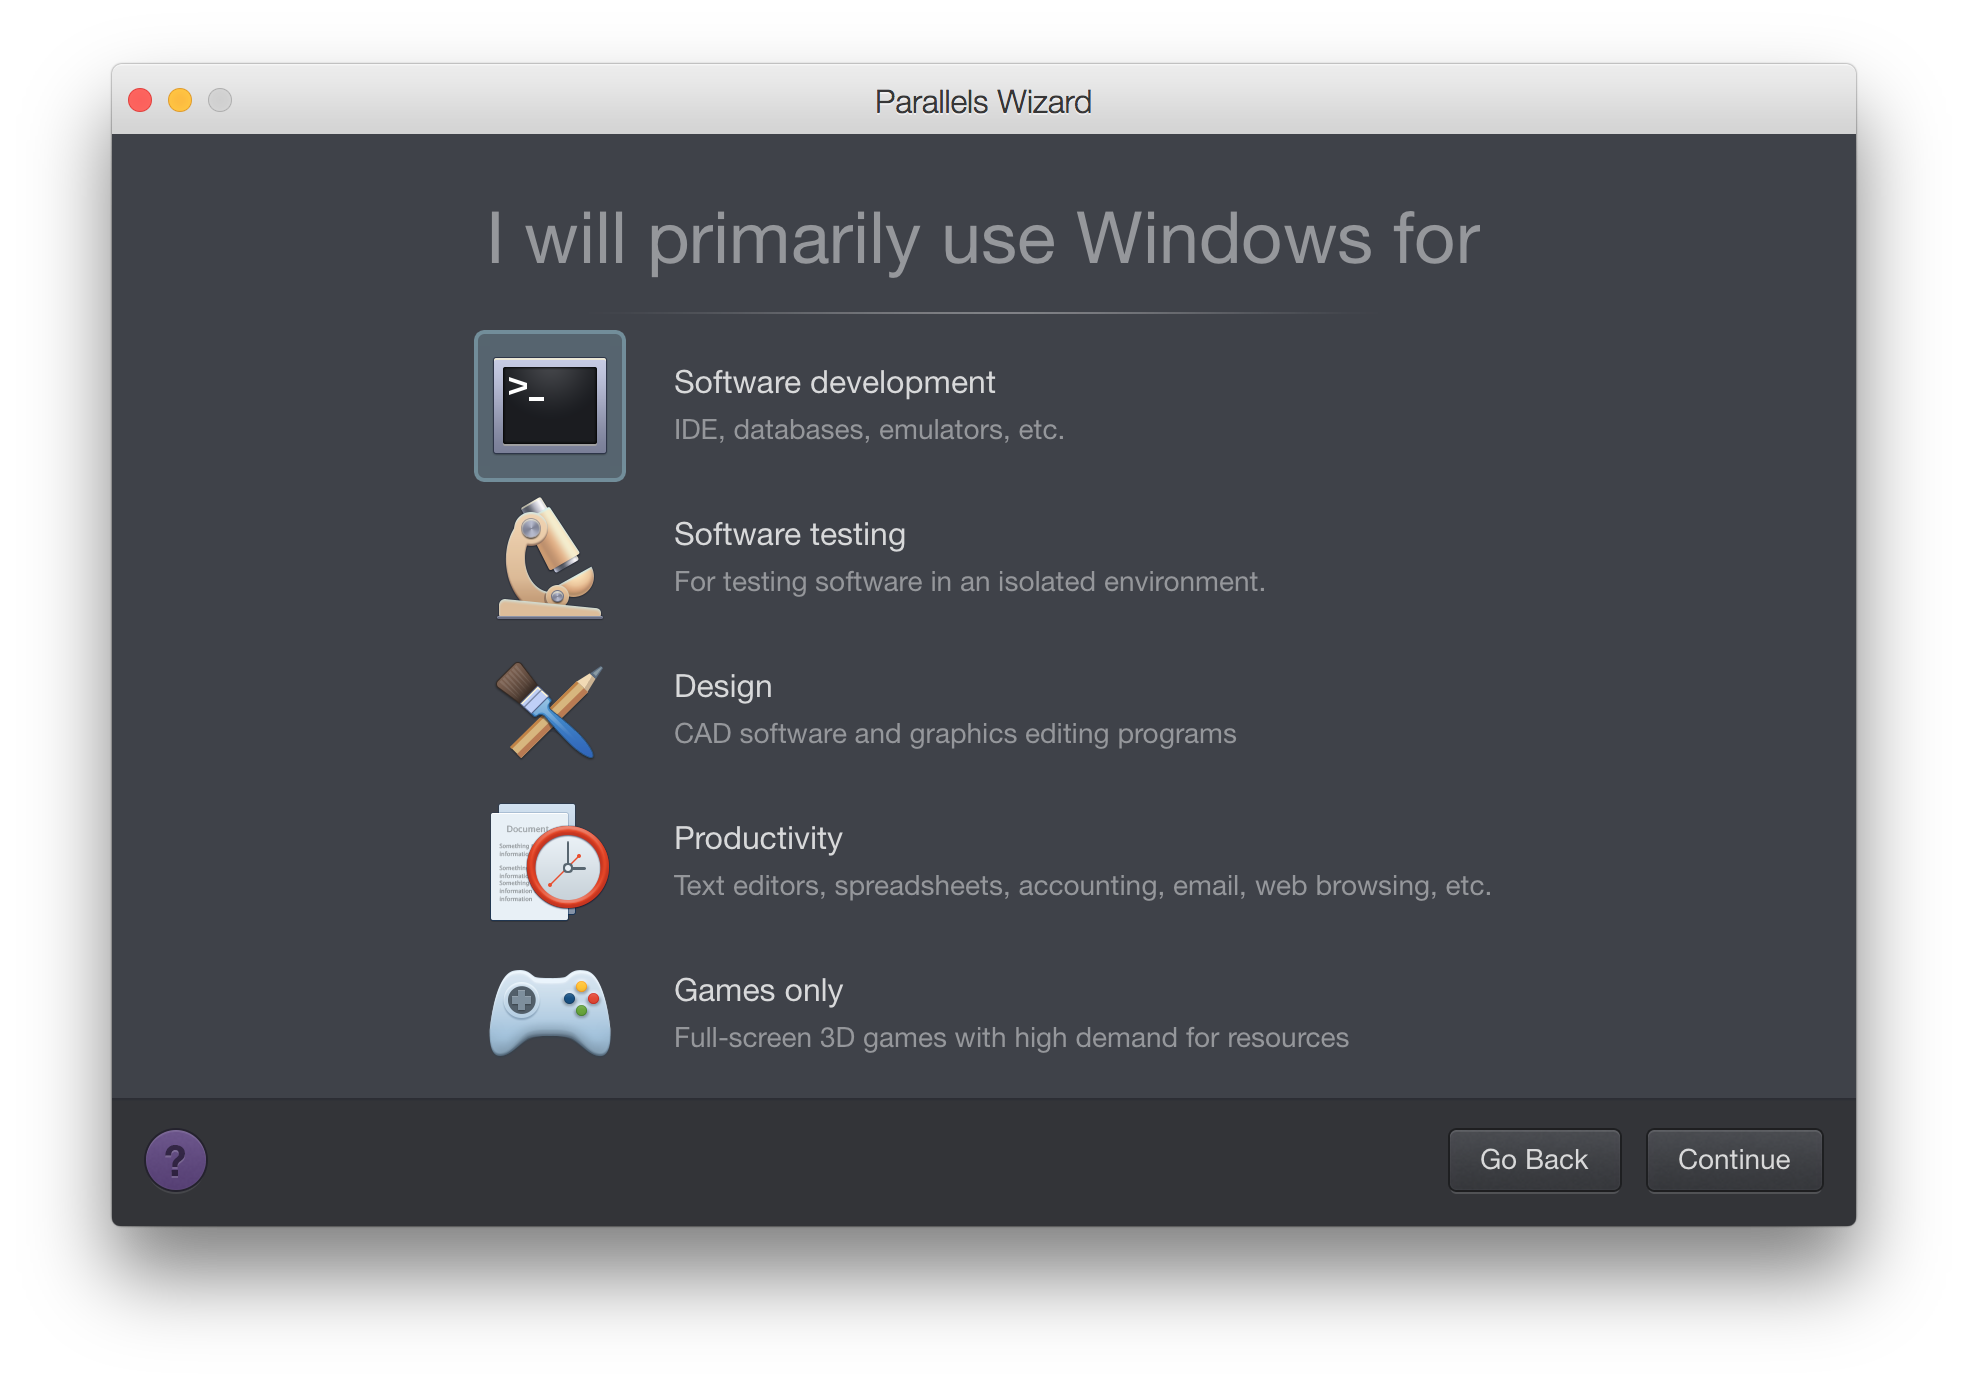
While you can preserve many of the defaults for this preset, you may want to make a few tweaks. I’m not going to provide an exhaustive list of every setting since many merely depend on personal preference, but I’ll highlight a few of the important ones:
| Tab | Category | Name | Value | Why |
|---|---|---|---|---|
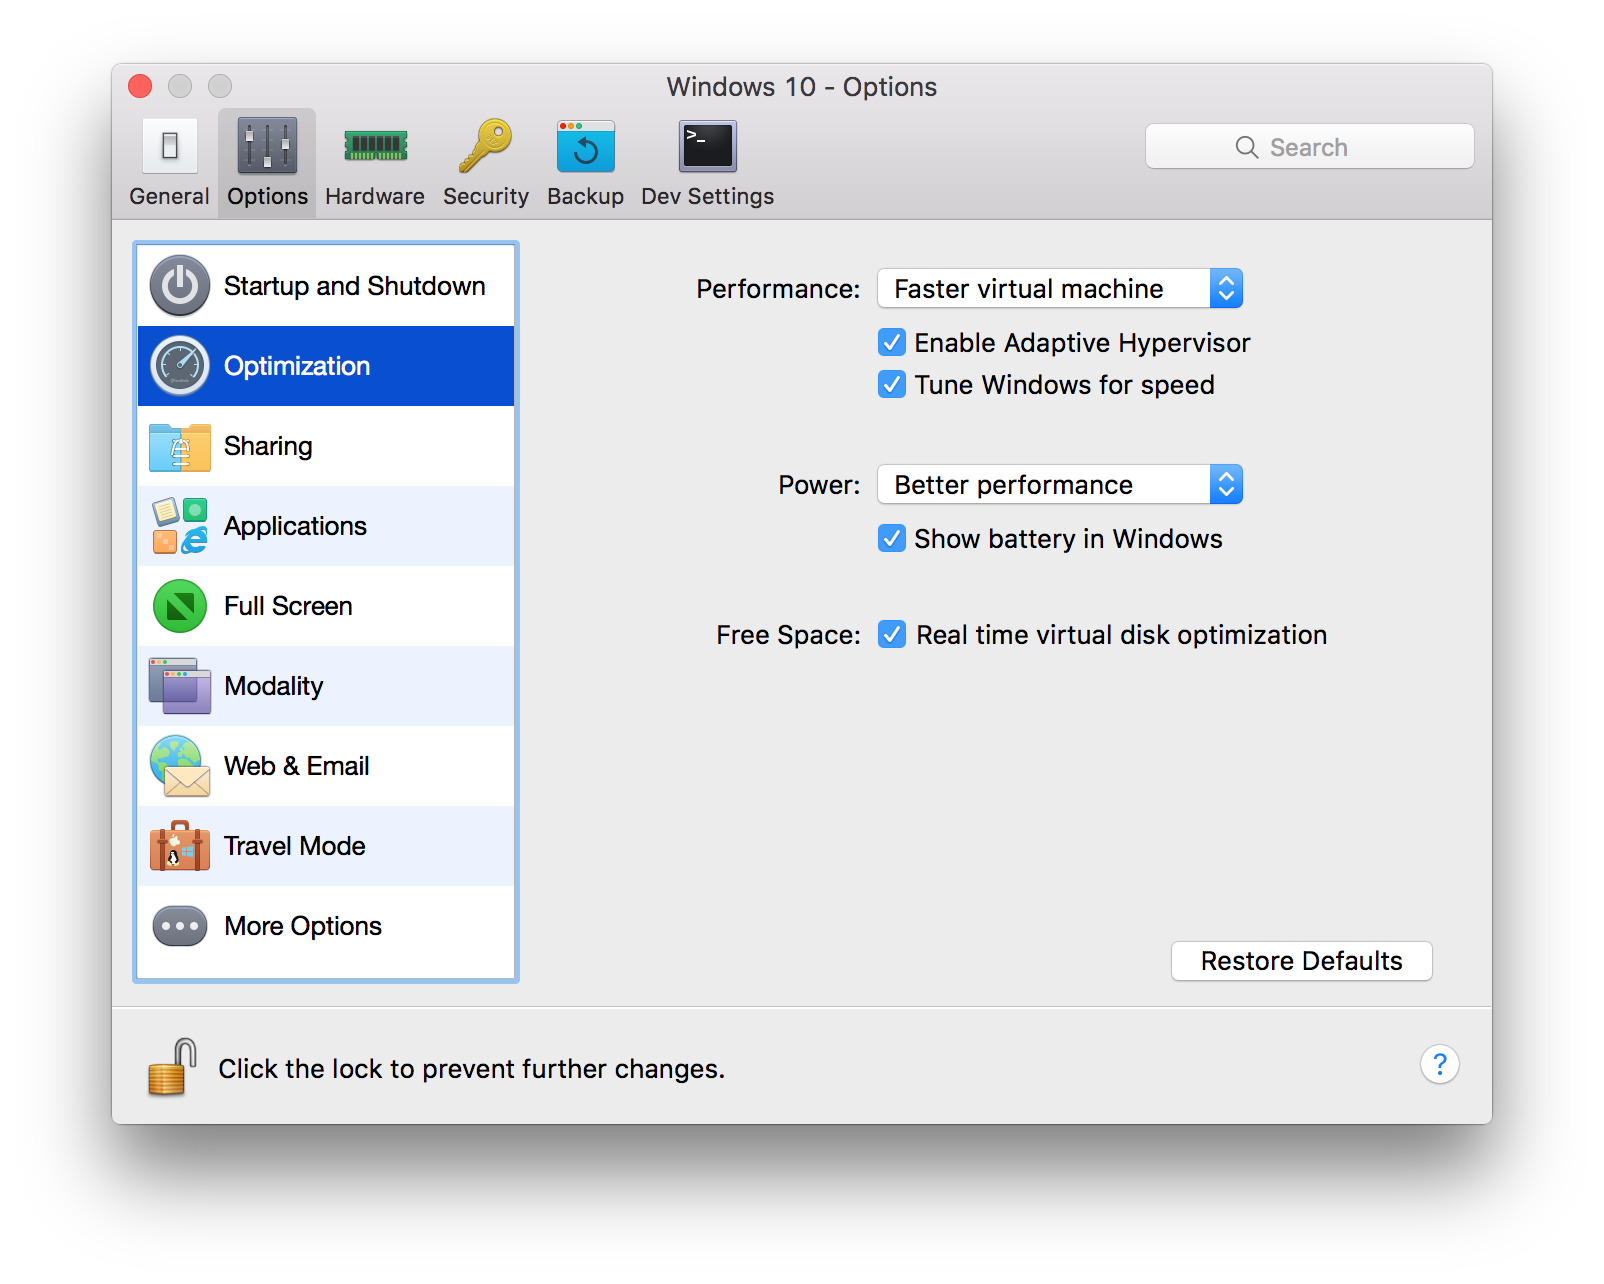
| Options | Optimization | Performance | Faster virtual machine | Your VM will always be the process starved for resources |
| Options | Optimization | Enable Hypervisor | Checked | Speeds up emulators running inside the VM |
| Options | Optimization | Tune Windows for Speed | Checked | Speed is more important than fancy animations |
| Options | Full Screen | Use OS X Full Screen | Checked | It took me a while to figure out how to get the resolution right, so I’m including it here. |
| Options | Full Screen | Allows Windows 10 to set display gamma | Checked | See above |
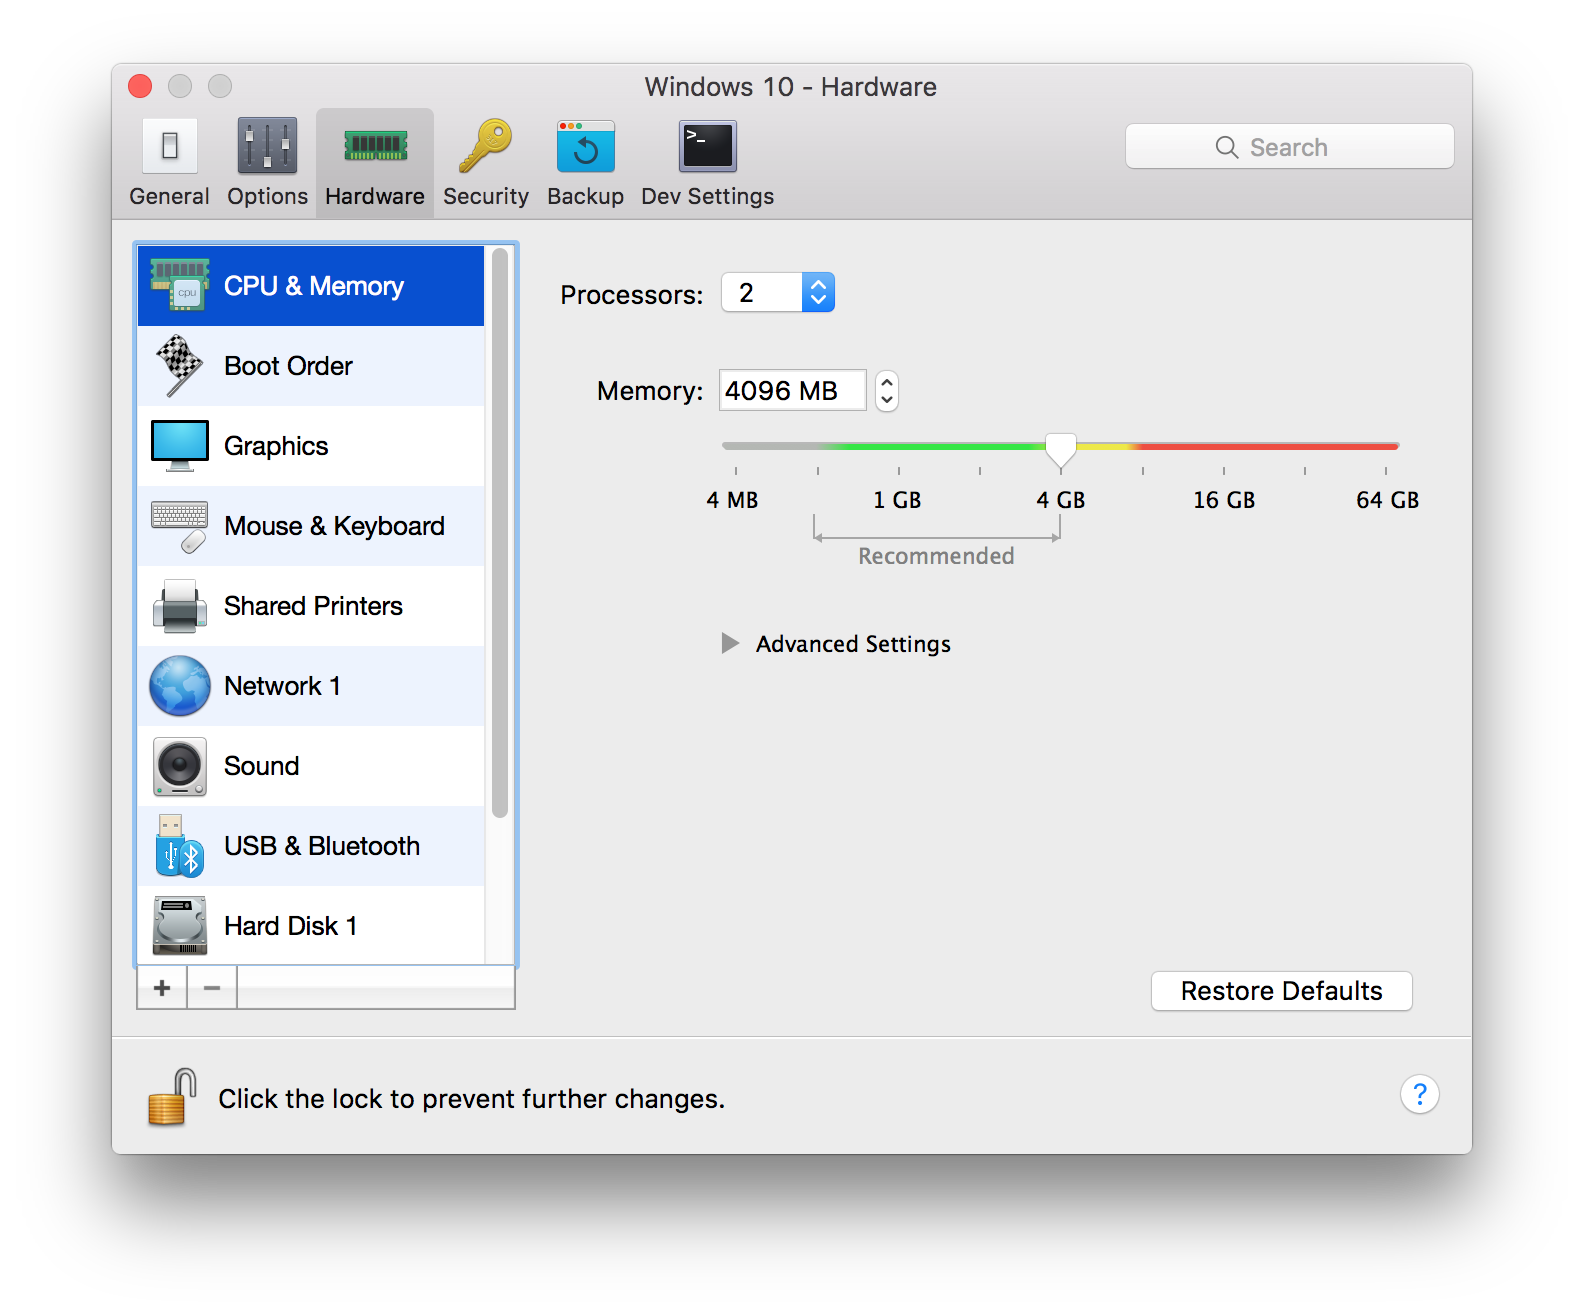
| Hardware | CPU & Memory | Processors | Half | As a general rule, allocate half of your available processors to the VM |
| Hardware | CPU & Memory | Memory | Half | As a general rule, allocate half of your available RAM to the VM |
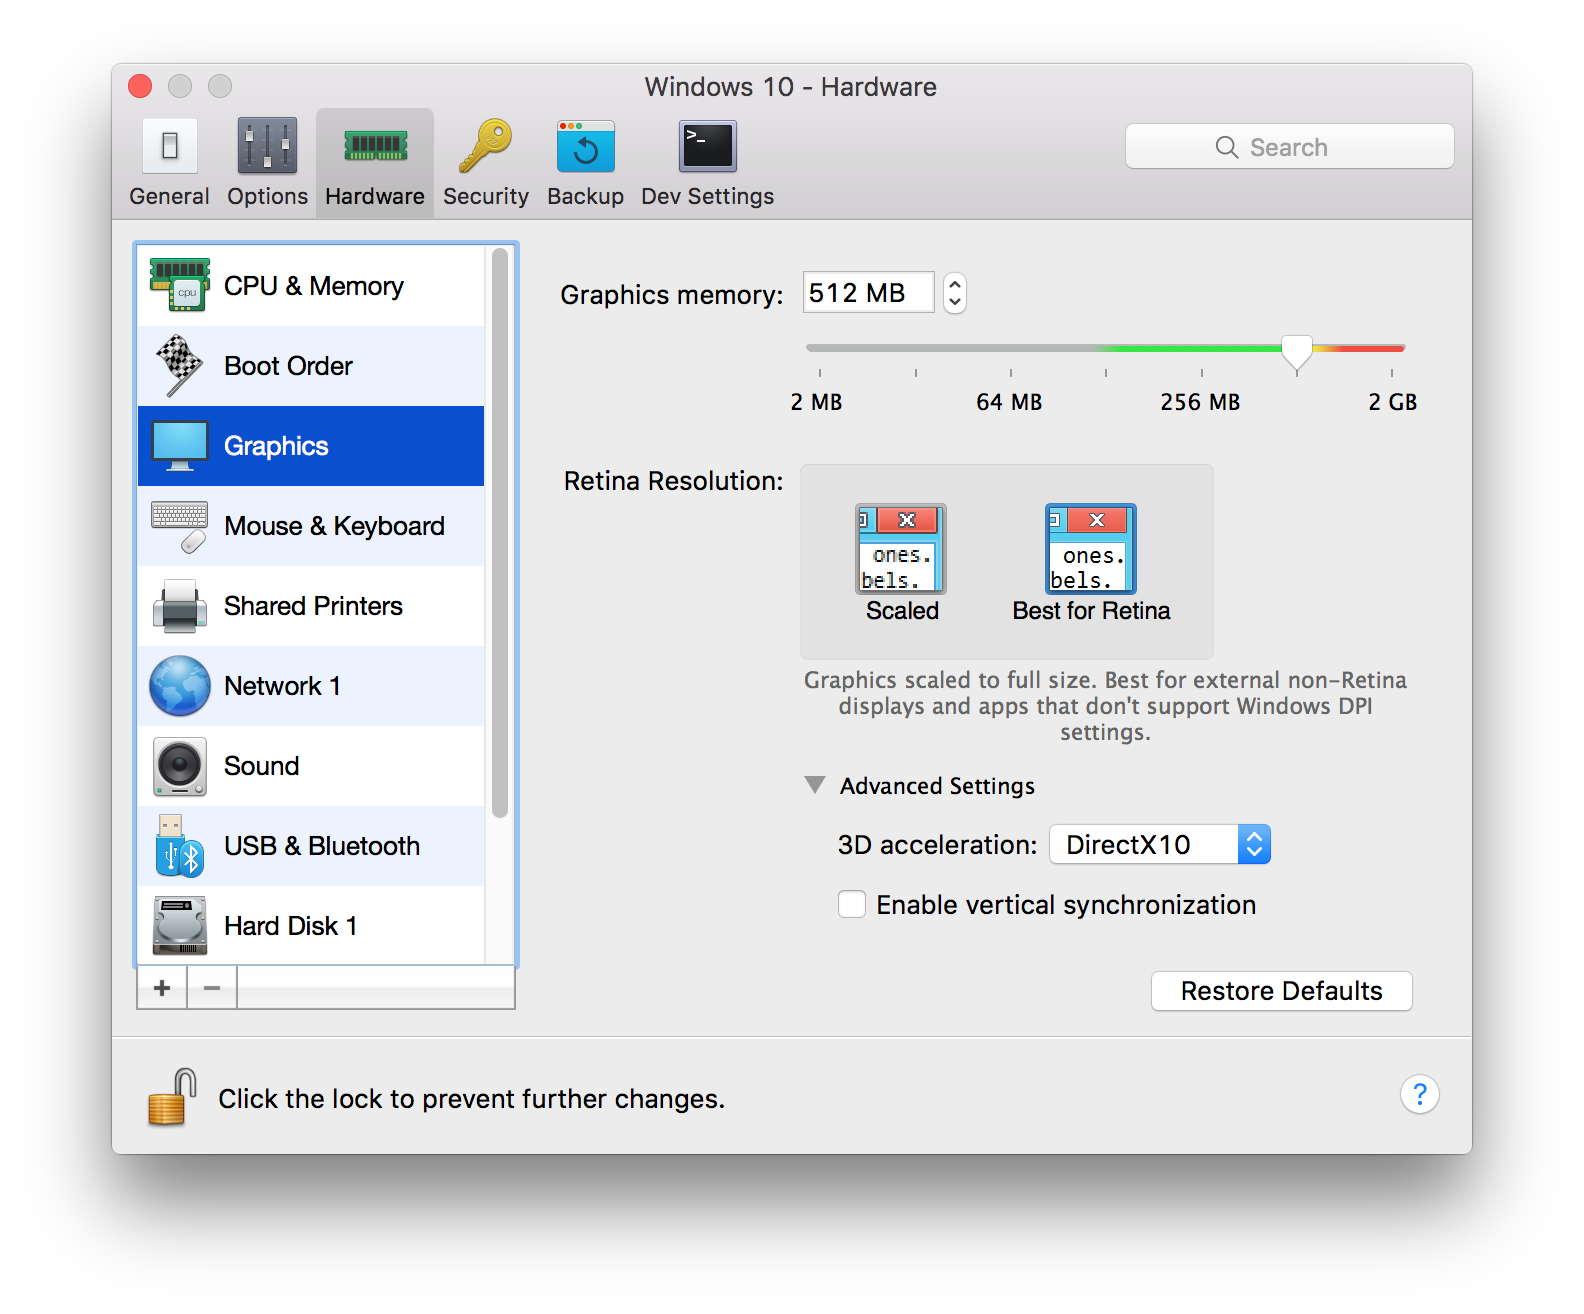
| Hardware | Graphics | Graphics Memory | Quarter | As a general rule, allocate one quarter of your available GPU to the VM |
| Hardware | Graphics | Retina Resolution | Best for Retina | It just looks better/crisper |
| Hardware | Graphics | 3D acceleration | DirectX10 | At least on my machine, this does some weird magic that makes full screen look “right” |
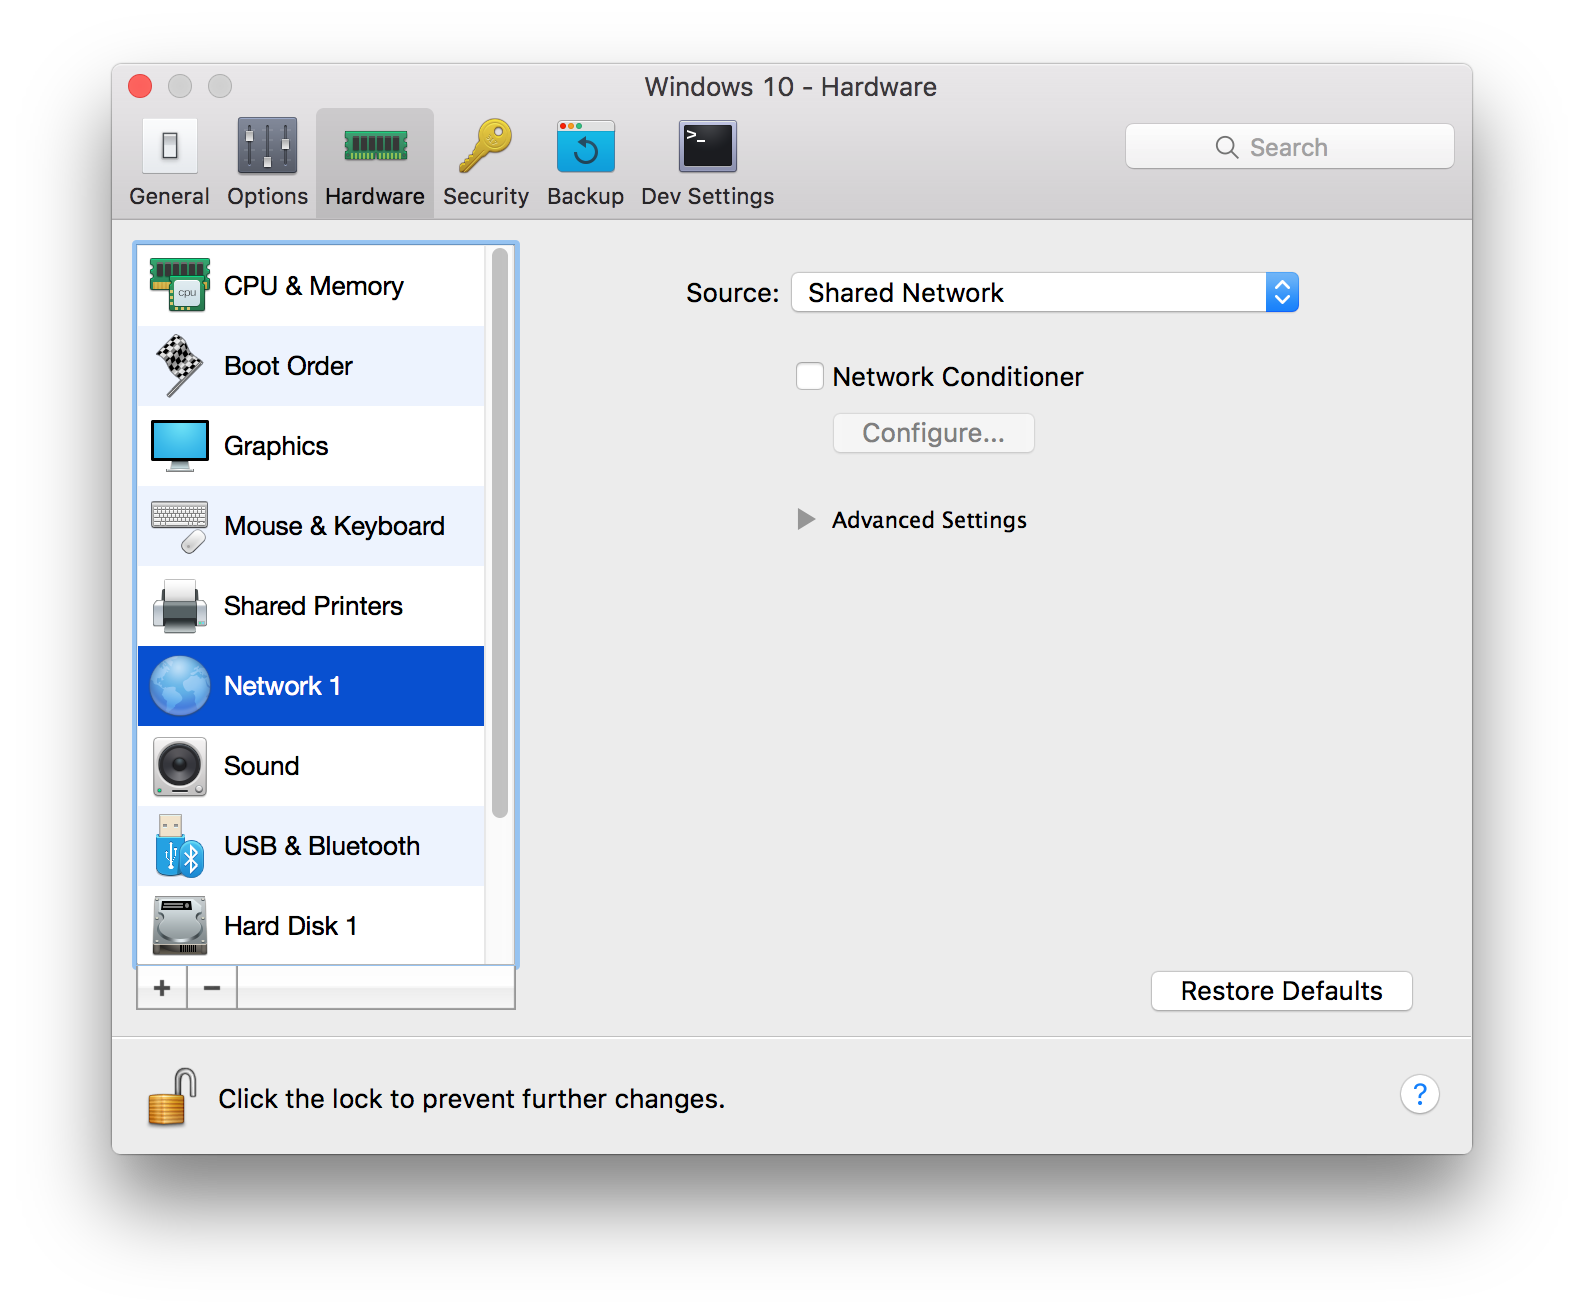
| Hardware | Network | Source | Shared Network | Makes it possible to delegate builds to Xcode and VS from either side of the machine |

Visual Studio
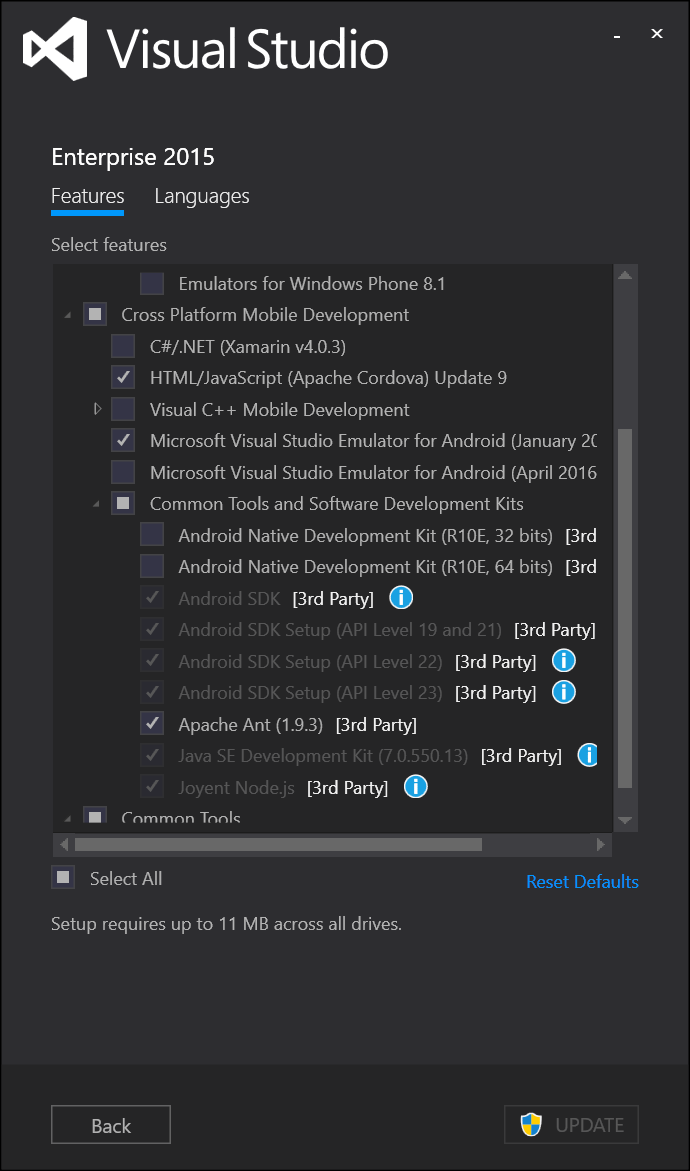
Once you’ve got Windows 10 up-and-running, you’ll want to install Visual Studio which includes all the build tools for Windows Universal Apps. Visual Studio 2015 Community Edition is “free for individual developers, open source projects, academic research, training, education, and small professional teams.” It also includes the Tools for Apache Cordova (a.k.a. “TACO”). Full Disclosure: I’m the product manager for TACO, so… yah, they’re kinda awesome.
“Free for individual developers, open source projects, academic research, training, education, and small professional teams.”
To install TACO, select it from the optional components during VS setup. If you already have Visual Studio installed, you can add TACO by going to “Change or Remove Programs” in the Control Panel, right-clicking on Visual Studio and selecting “Change.”
Visual Studio will install all the Windows and Android SDK build tools in your Parallels instance, so all the setup work you had to do on the Mac… it’s not necessary for Windows.
Local vs. Global
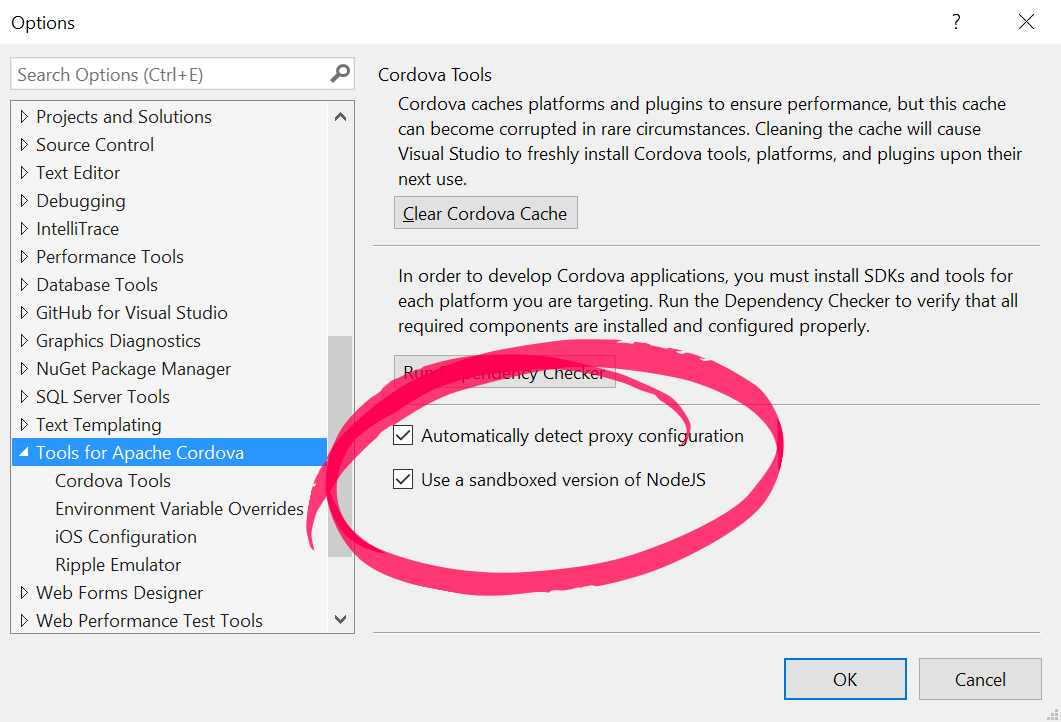
By default, VS installs a “sandboxed” version of Node + NPM similar to the one used by NVM on your Mac. As of this writing, Visual Studio installs Node 0.12 and NPM 2.2 because they are universally compatible with all versions of Cordova <=6.x. While I recommend using the sandboxed version, you can use the globally installed versions of Node + NPM by changing the settings in Tools > Options.
Remote Build Agent
Code on your Mac should be accessible to Windows and vice versa so long as Parallels is running. You can build from the command line or use Visual Studio’s built-in F5 launcher. If you want to build from Visual Studio, but deploy to an iOS simulator or device, you’ll need to setup a remote build agent.
In essence, the remote build agent is a light-weight node server that runs on your Mac and listens for builds from Visual Studio. When it receives a build request, it marshalls the request to Xcode. Upon finishing the build, it can either return the IPA to Visual Studio or deploy it to a Simulator/Device.
Share with Others
This isn’t entirely relevant to setting up a local development environment, but if you ever need to share your screen with others (e.g. during a virtual meeting or while presenting on-stage), then there are two other essential tools.
Celebrate! 🎉
You’ve reached the end of another long blog post. Celebrate your victory with another song in the playlist. I recommend selecting a classic from the archives, “F**k and Run” by Liz Phair.
File under cordova, node, nvm, npm, bash, android, ios, windows, xcode, visualstudio, and vscode